Propagation Methods


Protocorms and young seedlings of
three Cypripedium
species. From left to right: C. reginae, C.
guttatum, and
C.
formosanum. In each case, the culture tube occupying the
width of the
photo is 2.5 cm (1 inch) across.
Introduction.
In
this section I will present the methods we currently use to
produce all of our
Cypripedium
seedlings. Orchidists use one of two procedures in the lab to
grow orchids from seed: 1) collecting still-developing seed from
immature capsules ("green pod culture") or 2) beginning with fully
mature seed. The advantage to using immature seed from unripe
capsules is that the seed is not dormant; the embryo is
actively
growing and can be transferred directly to in vitro
culture, and there is no problem overcoming dormancy because the seed
is not yet dormant. The main difficulty with this procedure is
that
the seed must be collected during a very short window of time in which
the embryo can survive transfer from the mother plant and before the
mother plant imposes dormancy on the seed. Harvesting and
culturing mature seed is much more lenient regarding the time of
collection of the seed, but the main difficulty is that dormancy in the
seed must be broken artificially. Additional advantages of
the
use of mature seed are that 1) the mature seed can be stored for long
periods of time and remain viable and 2) because the seed is dormant,
it can be mailed or otherwise exchanged with other propagators
worldwide. At Spangle Creek Labs we propagate from mature
seed
almost exclusively.
Seed Collection.
Collecting
mature seed is relatively easy, but timing is important. The
seed
should be collected when it truly is mature and the mother plant has
imparted all vital materials to the seed, but the seed capsule needs to
be harvested before it dehisces, that is, splits open naturally.
The perfect time to collect the capsule would be a
few
seconds before dehiscence, but such precision is not necessary.
What is important is to collect the seed after the mother
plant
has given the seed everything she has to offer, but before the capsule
splits. If the capsule opens naturally, rain or dew may
provide
sufficient moisture that the seed becomes moldy, or worst of all, the
seed falls out and becomes lost. In moldy seed, fungal hyphae
reach deep into the seed and its embryo, and surface sterilization in
the lab cannot eliminate the fungus. In practice, Cyp seed
can be
harvested within days or even weeks of the optimal time, but take care
to avoid collecting too early or too late.
Treatment of
Mature Seed after Collection.
After
collection of a seed capsule, it should be opened in the lab with a
couple slices down the length of the capsule with a sharp knife or scalpel.
The seed should be poured and scraped out onto a piece of
clean
paper for drying in the air. The purpose of drying is to make
sure that the seed does not retain sufficient moisture to allow the
growth of mold. Depending on the ambient relative humidity,
the
length of drying may vary from two to five or more days. The
drying period should not be extended excessively as Cyp seed loses
vigor rapidly at room temperature.
After drying, I place the
seed in small glass vials with plastic caps for temporary storage in
the refrigerator at 0 to 4 degrees C until sowing.
The seed
can be kept at these temperatures for several months without much
deterioration in vitality. I have had seed of some species
stored
up to three years in the refrigerator and still germinate, but lower
temperatures are far better for long term storage. Cyp seed
is
not harmed by freezing, and I store seed long term in a freezer with
temperatures well below 0 C.
Mailing
Seed.
As
I mentioned above, one of the main advantages of working with
mature seed is that it can be exchanged by mail with growers all over
the world. A difficulty with such exchange, however, is that
mail
is often handled very roughly. In the U.S., mail sorting
machines
are brutal and will crush seed unless it is protected by a strong
container. I once even had a sturdy glass vial of seed
smashed by
this equipment. All too often I have received orchid seed mailed
in
paper envelopes from well meaning donors only to see under the
microscope that the seed had been crushed into a form similar to flakes
of breakfast cereal. Such seed will not germinate. Even seed
mailed in envelopes padded with bubble plastic often arrives damaged to
the point that there is minimal germination. To my knowledge,
a
1992 article by Warren Stoutamire was the first to alert orchid
propagators to this problem.
The
solution to this difficulty is
to mail seed in some sort of sturdy, rigid container. My
preference is to use micro-centrifuge tubes made of very strong
plastic, but anything strong enough to survive the mail-sorting
machines will do. Examples include old fashioned 35 mm
plastic
film canisters, compact disc boxes, and small jewelery boxes.
The
essential thing is to prevent the seeds from being crushed.
Sowing Seed.
Preliminary
Treatment of Seed.
Cypripedium seed,
like orchid seed in general, consists of an embryo within a seed coat
known as a testa. The testa is water repellent, and the seed
has
a large air space between the embryo and testa so the seed tends to
float on water. The seed, however, has a small opening at the
micropyle end, and so with appropriate techniques, the air can be
removed from the seed thus facilitating the entry of aqueous solutions
to surround the embryo intimately. These solutions are either
chemicals whose purpose is to remove impediments to germination on/in
the embryo, or nutrient solutions the embryo needs for germination and
subsequent growth.
To remove air from within the testa, the seed
is given a preliminary soak, under partial vacuum, in water purified by
reverse osmosis (RO), a technique I first learned from an article by
Allan Anderson (1989). In my application, I place a smidgen of seed in a small, ~100 mL, glass bottle and add
approximately 20 mL of RO water and a drop of the biological surfactant
Tween20. [I
currently use 0.02 N KOH instead of RO for this preliminary presoak as
described below in the page on the bleaching mechanism. This
substitution may shorten the subsequent bleaching time somewhat, but is
not necessary.] I then put the lid on the bottle and gently shake it
for
a couple minutes. Next, I remove the lid from the bottle and
replace it with a rubber stopper connected by plastic tubing to a hand
vacuum pump. This equipment is shown at the left.
In
my experience the
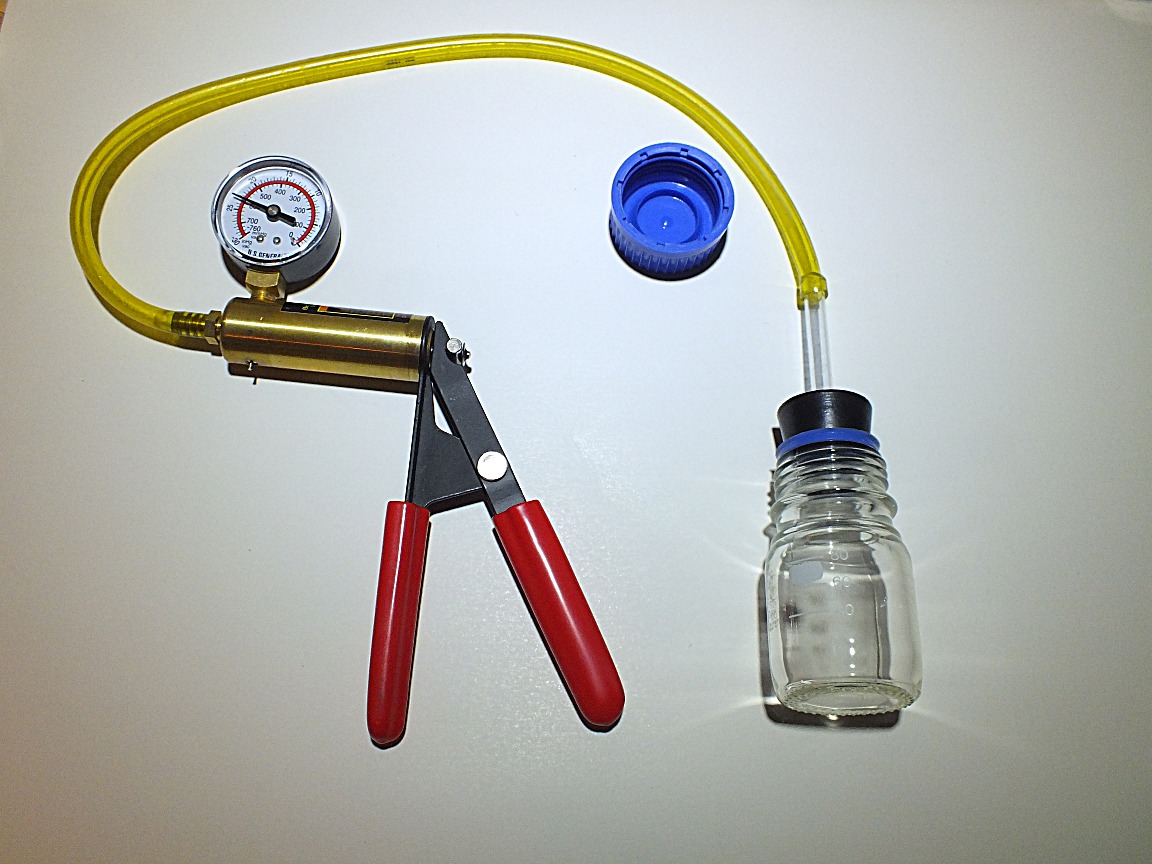 vacuum
pump can be purchased least expensively as a component of a
do-it-yourself automobile brake bleeding kit. The pump shown
is
capable of reducing atmospheric pressure by roughly 600 mm Hg, but a
little extra pumping is required every half hour or so as air gradually
leaks back into the system. Periodically, the bottle is
returned
to full atmospheric pressure and observed to see whether the seeds sink
to the bottom. Sometimes several cycles of pumping and
re-pressuring
are required to get most seeds to sink. Presumably, the low
density seeds that do not sink are defective and can be pipetted off
along with most of the water. When most seeds have sunk,
the overlying water is removed with a pipette along with any floating
debris and seeds. At this point, the seeds are ready for
bleaching. Centrifuging may be used as an alternative to vacuum
treatment, but the time required for the seeds to sink may be 90
minutes or more (Alex Baranowski, 2018, written
communication).
vacuum
pump can be purchased least expensively as a component of a
do-it-yourself automobile brake bleeding kit. The pump shown
is
capable of reducing atmospheric pressure by roughly 600 mm Hg, but a
little extra pumping is required every half hour or so as air gradually
leaks back into the system. Periodically, the bottle is
returned
to full atmospheric pressure and observed to see whether the seeds sink
to the bottom. Sometimes several cycles of pumping and
re-pressuring
are required to get most seeds to sink. Presumably, the low
density seeds that do not sink are defective and can be pipetted off
along with most of the water. When most seeds have sunk,
the overlying water is removed with a pipette along with any floating
debris and seeds. At this point, the seeds are ready for
bleaching. Centrifuging may be used as an alternative to vacuum
treatment, but the time required for the seeds to sink may be 90
minutes or more (Alex Baranowski, 2018, written
communication).
Bleaching
Because
the outside of mature orchid seeds from open capsules is infested with
microorganisms, surface sterilization of the seed in chlorine bleach
has long been a standard practice in orchid lab propagation.
There is, however, a second extremely important function of
the
bleaching of the seed: Extended bleaching results in removal or destruction of dormancy-promoting factors and results
in
greatly enhanced germination.
That lengthy bleaching speeds
germination and increases percentage germination was discovered
serendipitously by Allan Anderson (1989) when he accidentally left
Cypripedium seeds in the bleaching solution too long. The
beneficial effect of extended bleaching on the seeds of other genera of
terrestrial orchids was found independently by Ben Lindén (1980) in
Finland in a series of controlled experiments. The mechanism
for
the enhancement of germination by lengthy bleaching, that is, bleaching
longer than necessary merely for surface sterilization, is not
definitely known. The effect seems to be some combination of
demolition of the hydrophobic carapace, the residual layer of the inner
integument covering the embryo, by the bleach and the removal and/or
destruction of germination inhibiting chemical compounds by the highly
oxidizing bleach solution. In much of the orchid propagation
literature, the positive effect of bleaching on germination is
attributed to action of the bleach on the testa or seed coat with
claims that bleaching destroys the cutinaceous nature of the testa,
thus allowing water or germination medium to enter the cavity of the
seed containing the embryo. I am convinced, however, that
this is
not the mechanism, for the testa has an opening at the micropylar end
that permits entry of liquid into the space containing the embryo.
That the bleach readily enters the seed coat after the vacuum
treatment and directly attacks the carapace can easily be observed
under the microscope, for even in the early stages of bleaching the
formation of gas bubbles can be seen in the seed cavity as the bleach
reacts with the carapace. Moreover, in many Cypripedium seeds
the
colored carapace can be seen to be removed as the bleaching process
continues. In summary, there are two reasons for bleaching:
1) to
accomplish surface sterilization of the seed, and 2) to remove
germination inhibitors.
The
bleaching solution is prepared by diluting a
commercial sodium hypochlorite (NaOCl) household bleach, namely Clorox®,
with water to obtain a bleaching solution that is 0.5% NaOCl.
I
do the dilution in a 100 mL graduated cylinder, diluting the commercial
bleach with enough water to make 100 mL of solution. I then
pipette roughly 10 mL of this solution onto the seeds in the bottle,
being very gentle so as not to cause any seeds to float again.
After this10 mL quantity of solution has been pipetted into
the bottle, I
gently pour the rest of the solution from the cylinder into the bottle and agitate the contents from time to time.
Bleaching
times of 5-10 minutes are generally sufficient for surface
sterilization unless the seeds are actually infected, but most Cyp
species require considerably longer bleaching for removal of
germination inhibitors. The optimal duration of the bleaching is
usually in the range of 15-150 minutes and varies considerably not only
among different species but within different batches of seed of the
same species. Within a species, different clones may have
considerably different optimal bleaching times, and this time may vary
from one year to the next for seed of the same clone.
In
preparing the bleaching solution, use of fresh commercial bleach is
extremely important, for the activity of the bleach decreases with
time; the shelf life is not very long. I try to
purchase
fresh bleach at a large supermarket with a rapid turnover of
merchandise, and I do not use bleach more than three or four months
old. The change in the strength of bleach with time is yet
another source of variability in the bleaching time, but this
variability can be reduced by always using fresh bleach.
I have done some experiments indicating certain refinements to
this bleaching protocol, and I hope to expound on them in a future
update to this page.
Rinsing
Rinsing
of the seed is probably not necessary as I suspect what little residual
bleach remaining on the seed once the bleach is poured off is quickly
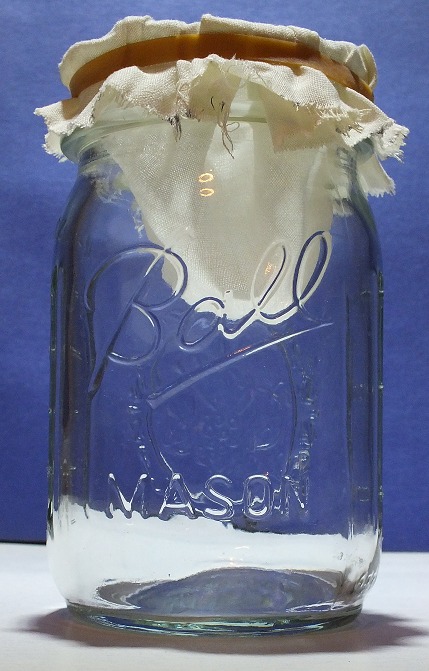
dissipated. Nevertheless I do routinely rinse the seed once
the
desired bleaching time is reached. In my procedure, I pour
the
seed and bleach from the bottle onto a sheet of finely woven cloth cut
from an old sheet or pillow case placed over the mouth of a canning jar
and secured with rubber bands as shown in the figure at the right.
The cloth is pushed downward into the jar to create a
depression
to serve as a filter through which the bleaching solution passes but
retains the seeds. The jar and filter
 are pressure sterilized along with the culture
medium and are placed in a laminar flow hood.
are pressure sterilized along with the culture
medium and are placed in a laminar flow hood.
When
the bleaching of the seeds is completed, the bottle of bleach and seeds
is surface sterilized by immersion in alcohol for 30 seconds and placed in
the laminar flow hood. The bottle is then opened in the hood
and
the contents poured into the cloth depression on top of the canning
jar. The liquid quickly drains through the cloth filter
leaving
the seeds deposited at the bottom of the cloth depression.
Three
or four rinses of sterile reverse osmosis water are then poured over
the seeds. The entire process is done in the bath of clean
air inside the laminar flow hood. The seeds are allowed to dry for
a
few minutes, so that they will stick to the tip of a damp needle for
placing on the medium in the culture tubes. Many orchid labs
use
a procedure in which the seeds and bleach are poured onto a sheet of
filter paper in a Bűchner funnel with vacuum being used to draw the
bleach solution through the filter paper, but I find the procedure
outlined here to be considerably more convenient.
Sowing
I
use a sowing procedure that is very simple, albeit a bit tedious.
I simply prick the seeds off the cloth filter in the canning
jar
using a long sterile needle and place them where I want them on the
surface of the planting medium. The needles I use are
homemade
implements with handles. I purchase very long needles at a
craft store, and the handles are segments of plastic rod cut from a
plastic coat hanger. The blunt end of a needle is heated in the
flame of an alcohol lamp and thrust into a piece of the plastic rod to
create a needle with a plastic handle.
Germination Medium
In
nature, terrestrial orchid seeds must be invaded by a soil fungus to
germinate; the fungus supplies nutrients and other substances
necessary for germination and growth of the new protocorm.
The
orchid seedling and fungus form a mycorrhizal relationship, and the
fungus provides nutrients to the orchid until it reaches a stage at
which it can put a green leaf above ground and obtain energy through
photosynthesis. Most Cypripedium
orchids can live as autotrophs from this stage on.
While
many terrestrial orchids can be germinated in the lab with the aid of a
fungus, maintaining an artificial environment in which both organisms
live in a balanced relationship proves difficult, and at least at the
present time, germination and early growth of terrestrial orchids is
carried out asymbiotically without the use of a fungus. In
asymbiotic culture, a synthetic medium, usually in the form of an agar
gel, provides the orchid with all the nutrients it needs.
Years
of laboratory work have gone into efforts to optimize growth media for
a variety of different species. Different species of orchids
have
different nutritional requirements, and individual propagators have
developed their own preferred medium for each species. Table
1
below specifies the composition of my general purpose Cyp medium in
mg/L of medium, the bulk of the medium consisting of water purified by
reverse osmosis (RO).
The substances in this recipe are mostly mineral nutrients
required by the young orchid. I
have found that most Cyp species germinate and grow reasonably well on
this medium although there are many species that do better on slight
variations of this medium. For example, C. reginae
protocorms grow much faster with 500 mg/L casein hydrolysate, whereas C. calceolus and C. kentuckiense do
better with less casein. As described below, a sugar is also
essential to provide energy to the growing plants.
 In
preparing the medium, I usually weigh out the major constituents
individually but add the minor and trace elements from stock solutions.
In Table 1, the constituents in the red area are contained in
one
stock solution, and those in the green area are in a separate stock
solution. The ingredients are initially added to roughly 0.9
L of
RO water, and after all the items in the table are included, a sugar is
added as described subsequently, and the pH is adjusted to the desired
level by addition of 0.5 N KOH solution. Finally the volume
of
the medium is brought up to 1.0 L by addition of RO water. In
actual practice, I usually add the agar after the medium has been
brought up to 1.0 L volume. As for the optimal pH of the
medium, I usually choose something in the range of 6.0 to 6.3.
This is a bit higher than many orchidists use, and I like the
higher pH because the plants add H+
ions to the medium during incubation resulting in a gradual
drop in medium pH. The drawback to increasing the pH to
higher values is that some calcium and phosphorus precipitate out of the
medium as calcium phosphate. Thus the choice of pH is a
compromise between keeping the plants in the range in which they are
happy and retaining all of the calcium and phosphorus in the medium.
In
preparing the medium, I usually weigh out the major constituents
individually but add the minor and trace elements from stock solutions.
In Table 1, the constituents in the red area are contained in
one
stock solution, and those in the green area are in a separate stock
solution. The ingredients are initially added to roughly 0.9
L of
RO water, and after all the items in the table are included, a sugar is
added as described subsequently, and the pH is adjusted to the desired
level by addition of 0.5 N KOH solution. Finally the volume
of
the medium is brought up to 1.0 L by addition of RO water. In
actual practice, I usually add the agar after the medium has been
brought up to 1.0 L volume. As for the optimal pH of the
medium, I usually choose something in the range of 6.0 to 6.3.
This is a bit higher than many orchidists use, and I like the
higher pH because the plants add H+
ions to the medium during incubation resulting in a gradual
drop in medium pH. The drawback to increasing the pH to
higher values is that some calcium and phosphorus precipitate out of the
medium as calcium phosphate. Thus the choice of pH is a
compromise between keeping the plants in the range in which they are
happy and retaining all of the calcium and phosphorus in the medium.
Three
of the most important medium ingredients are not shown in Table 1,
namely, a cytokinin, raw Russett potato, and a sugar.
Adding a cytokinin is
not necessary for germinating seeds of many Cyp species, but is quite
helpful for some including C.
arietinum and C.
reginae.
I have experimented with several cytokinins and found that
kinetin (6-Furfurylaminopurine) and BA (6-Benzylaminopurine) are quite
effective in stimulating embryo and early protocorm growth in
concentrations of 0.1 to 0.5 mg/L. While beneficial in the
germination medium, cytokinins cause abnormal protocorm development,
particularly as the first-root growth stage is approached, and
therefore using the lowest concentration that is effective is a good
plan. Moreover, replating of the protocorms from the germination medium
to a medium without added cytokinin is important. There are
stronger cytokinins including meta-Topolin
(6-(3-Hydroxybenzylamino)purine) and TDZ (Thidiazuron) that are even
more effective in promoting embryo and early protocorm growth, but
these are very deleterious to subsequent development and demand that
the protocorms be replated to cytokinin-free medium at a very early
stage. I routinely use kinetin as my cytokinin of choice and
always at the lowest concentration that is effective.
The
second ingredient not listed in Table 1 is raw potato. Potato
is
what is known as an undefined additive because the chemical composition
of a potato is very complex, and no one really knows why addition of
potato has a positive effect on germination and early growth.
I
have long felt that such undefined additives are unscientific, and that
if we really knew what we were doing in plant tissue culture, use of
such additives would be unnecessary. Then one day I happened to attend
a lecture by a leading cancer researcher and learned from his talk that
even in such well funded cutting edge medical research, undefined
additives such as "fetal bovine serum" are used in the culture of
animal cells. While I still think that if we had complete
knowledge of the requirements of our young orchids including whatever
combination of cytokinins, auxins, and vitamins the potato or other
undefined additives provide, we would be able to grow our plants on
completely defined media.
My germination cultures consist of
test tubes each containing 25 mL of medium. To each tube I
add
1-cm cubes cut from a raw Russett potato before pressure sterilization.
The amount of potato per tube varies considerably from one
Cyp
species to another. Some species such as C. californicum do
best with only half a 1-cm potato cube per 25 mL of medium, whereas
other species such as C.
candidum and C.
parviflorum
require three 1-cm cubes per 25 mL of medium for optimum germination
and growth. Interestingly, an excess of potato above the optimal level
results in very high protocorm mortality.
Orchidists in general
use a wide variety of undefined additives: not only potato, but things
like banana or coconut water. Early on, I chose to work with
potato because I considered the composition of things like banana or
coconut water to vary too much from one fruit to another owing to the
stage of ripeness among other factors. Recently, prepackaged
pure
coconut water has become available at health food stores and even at
large
supermarkets, and this product seems much more consistent than does the
liquid from one supermarket coconut to another. I have been
experimenting with the commercial pure coconut water and have found
that for some species, adding a small amount of coconut water in
addition to the usual potato accelerates early growth.
Finally,
the medium must contain a sugar as an energy source for the growing
plants. In nature, the germinating seeds would obtain their
energy from their fungal host, but in axenic culture, the growth medium
itself must provide the energy in the form of a carbohydrate the young
orchids can utilize. Most often this sugar is glucose or
sucrose.
Either seems entirely satisfactory in supporting Cyp growth.
I
have long used glucose because of its simpler composition; I
was
concerned about the breakdown of sucrose into glucose and fructose in
aqueous solution. Although subsequent experiments showed that
such
hydrolysis does not cause a problem in Cyp cultures, I have continued
to use glucose most of the time, in large part because where I live in
the Upper Midwest, glucose is not expensive; it can be
purchased
as "corn sugar," "grape sugar," or "dextrose" from home wine and beer
brewing supply stores. The term "dextrose" refers to the R-
enantiomer, which is the naturally occurring form of glucose.
For almost all species, I routinely use 20 g/L glucose in the
germination medium, notable exceptions being C. calceolus and C. kentuckiense
for which I use a bit less.
To summarize, my general germination medium has the composition:
[Table
1] + [20 g/L glucose (or sucrose)]
+ [0.0 to 0.5 mg/L kinetin] +
[20 to 120 potato cubes per L]
Incubation
After sowing the seeds on the germination medium, the cultures are
placed in a box that is moved to a cabinet for incubation in the dark.
Most Cyp seeds will not germinate in the light;
they require the darkness that they would experience
underground in nature. I once found seeds of C. parviflorum var.
makasin
that would germinate in dim room light, but even they germinated better
in darkness.
Resist the temptation to examine cultures in the light.
Exposure to light for even a few minutes during the
germination process kills germinating embryos and new protocorms of
many species. Of course, looking at the cultures to check for
contamination is important, so what is one to do? I routinely
sow seeds in sets of 10 culture tubes containing 25 mL of medium, and I
consider one of these a "sacrifice tube," which I examine to check for
germination and contamination while maintaining the other nine tubes in
darkness. Even using such a sacrifice tubes, I still wait at
least a month to examine it in the light for the first time.
Germination can usually be seen using a 10 power hand lens,
but a binocular dissecting microscope magnifying 20 power or more gives
a much better view.
The proper temperature during incubation is important. Most
Cyp seeds germinate well and the protocorms grow well at roughly room
temperature, that is, 18 to 22 C (64 to 72 F). There are
exceptions, however; for example seeds of C. irapeanum
germinate better and the protocorms grow better at temperatures a bit
above 22 C.
Replating.
Replating is simply using a sterile needle to move protocorms or
seedlings from the germination medium to the replating medium. I
use the same home made needles I use for sowing in replating.
When to Replate
After
successful germination and several months of incubation in the dark at
room temperature, protocorms or young seedlings (An orchid seedling is
a plant with a root.) become too crowded, and the medium becomes too
depleted in nutrients for further growth. I usually replate
seedlings when roughly one third to one half of the protocorms have
entered the first-root stage. There are several factors that
determine the optimal time for replating. The photo at right shows C. reginae seedlings and
protocorms at a good state for replating. For some species,
large protocorms and seedlings survive transplanting better than small
protocorms. In cases where the germination medium includes a
cytokinin, this growth regulator may cause abnormal development as
growth progresses, in which case moving the protocorms to a new medium
without the cytokinin at an early stage when the protocorms are still
quite small is important. In some species, the development of root hairs known
as rhizoids (visible in the three photos at the top of this page)
is a practical consideration for when to replate because as the
protocorms or seedlings get larger, their hairs become entangled making
separation of the plantlets during replating very difficult.
for replating. The photo at right shows C. reginae seedlings and
protocorms at a good state for replating. For some species,
large protocorms and seedlings survive transplanting better than small
protocorms. In cases where the germination medium includes a
cytokinin, this growth regulator may cause abnormal development as
growth progresses, in which case moving the protocorms to a new medium
without the cytokinin at an early stage when the protocorms are still
quite small is important. In some species, the development of root hairs known
as rhizoids (visible in the three photos at the top of this page)
is a practical consideration for when to replate because as the
protocorms or seedlings get larger, their hairs become entangled making
separation of the plantlets during replating very difficult.
Replating Medium
The
replating medium usually differs from the germination medium in several
important ways: 1) No cytokinin is added to the replating medium. 2)
The type and quantity of gelling agent is adjusted to give a
mechanically weaker gel than the germination medium, and 3) The number
of potato cubes per liter of medium may be different for the replating
medium.
As mentioned above, excessive cytokinin in the
germination medium may interfere with normal differentiation of tissues
and development of organs as the plants grow. Some species are much more
sensitive to the cytokinin than others in this regard, but in no
case is there a need for kinetin or other cytokinin to be added to the
replating medium.
The relatively large amount of agar added to
the germination medium produces a strong gel. The reason so much
agar is used is to reduce the amount of residual water in the culture
tubes, so that the seeds to not float around randomly on the surface of
the gel after sowing. The first roots of the little plants may or
may not be able to penetrate this gel, so replating to a medium with
weaker gel is helpful in facilitating root growth. When using
agar for the replating medium, I usually use as little as 4.0 g/L.
Most often, however, I use a gellan gum as the gelling agent in my
replating medium. Gellan gum has several advantages over agar,
one being that it makes a clearer gel than does agar. Gellan gum
also cleans from glassware much more easily than does agar.
Finally, gellan gum is cheaper to use than agar. Kilogram
for kilogram, the gum powder is more expensive than agar, but far less
gum is needed to gel the medium. I normally use only 0.3 to 0.35
g/L gellan gum, making a nice weak gel that roots can easily penetrate.
For gellan gum to form a gel, some divalent cations,
particularly Ca+2, are needed, and in special purpose replate media such as the one I use for C. arietinum, which has a low calcium concentration, a bit more gellan gum is necessary.
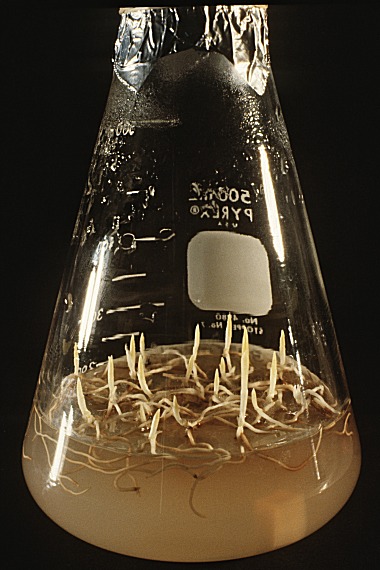 An
important consideration for replating is how much medium should be
allocated to each seedling. Clearly, cramming more seedlings into
a flask with a given volume of medium would be cheaper and quicker, but
there is a cost in reduced seedling growth. I normally replate
seedlings at a density that gives 10 mL of medium to each seedling.
For example, I most often place 20 seedlings on 200 mL of medium
in a 500 mL flask. The photo at the left shows a 500 mL flask of
C. kentuckiense seedlings.
An
important consideration for replating is how much medium should be
allocated to each seedling. Clearly, cramming more seedlings into
a flask with a given volume of medium would be cheaper and quicker, but
there is a cost in reduced seedling growth. I normally replate
seedlings at a density that gives 10 mL of medium to each seedling.
For example, I most often place 20 seedlings on 200 mL of medium
in a 500 mL flask. The photo at the left shows a 500 mL flask of
C. kentuckiense seedlings.
After
transfer of protocorms and seedlings to the flask, it is incubated in
the dark for several additional months, the actual number depending
considerably upon the species. Some species are ready to be
removed from the flask after five or six months of further growth,
whereas some require considerably longer. The total length of
incubation required to produce seedlings is very helpful in deciding
when to sow the seeds so as to produce seedlings ready for planting in
spring. I routinely replate seedlings only once, transferring
them directly from the germination medium to the final flask.
This procedure seems to produce seedlings adequate in size for
planting out, but I have seen larger seedlings produced by use of a
second replating to fresh medium.
Deflasking Seedlings.
Several factors determine when
to remove the seedlings from the flask, rinse off the gel, and place
them in the refrigerator for several months of vernalization. Clearly,
if the seedlings stop growing or if their root tips start turning
brown, the seedlings should be removed pronto.
More often, however, the seedlings may still be growing, but yet
timing dictates that they should be removed from the flask and
refrigerated so as to have adequate cool time for vernalization and be
planted out in the spring. In this case, the grower must make a
judgment call: Are the seedlings large and vigorous enough to produce
an aerial shoot after vernalization? One of the best clues is the
size of the shoot bud; it must be large enough to indicate
sufficiently developed leaves for growth next season. There is
considerable variation of the size of the bud among species, but as a
generalization, I recommend that the bud be at least 0.5 cm tall and
preferably closer to 1 cm.
Upon removal from the flask, any gel
clinging to the roots should be washed off under a strong spray of
water. The ideal would be to wash off every bit of the gel so as
not to provide nutrients to encourage microbes or fungi to grow during
refrigeration, but in species in which the orchid roots are hairy,
removing all the gel is sometimes difficult. Usually, a little
remaining gel is not harmful because it has been thoroughly depleted in many
nutrients by the plants.
Refrigeration
After
the seedlings have been thoroughly rinsed, I usually place them in
plastic food storage boxes or trays, purchased at a supermarket for
refrigerating the seedlings. Such trays are not quite airtight
thus permitting gas exchange, but at refrigerator temperatures, the
seedlings usually do not desiccate providing they are still wet from
rinsing when placed in the box. Depending on the size of the
seedlings and the size of the tray, I usually place between 50 and 100
seedlings in each tray. Occasionally, when I have a great number
of seedlings, I may use larger trays and place as many as 200 in each.
During refrigeration, the seedlings should be checked from time
to time, and if they appear to be drying out too much, add just a
little water, no more than a few mLs, to the bottom of the tray.
I also vernalize small numbers of seedlings in food freezer bags.
Some propagators use similar polyethylene freezer bags even for
large numbers of seedlings without any problems. Be sure,
however, to use freezer bags; lighter weight bags permit water
loss at a rate high enough that the seedlings will desiccate after
several weeks.
For
proper vernalization, the temperature should be held just slightly above
freezing: 0 to 4 C (32 to 39 F). The closer the temperature is to
freezing, the more rapidly the seedlings vernalize, but great care must
be taken to prevent freezing. Preventing freezing in the
refrigerator is often difficult because these devices usually have
large temperature gradients and cold spots. No doubt most people
have had the experience that upon dialing down the temperature in the
fridge to keep the milk from spoiling, the lettuce in another spot
freezes. Why freezing of Cyp seedlings just out of the flask
kills them but freezing of outdoor seedlings of the same size in the
ground does not, is a mystery. Clearly somehow growing in the
soil and subject to natural conditions hardens the seedlings to
withstand being frozen solid. Freezing of deflasked seedlings in
the refrigerator invariably kills them.
Although
the seedlings are not maintained in sterile conditions during
refrigeration, microbial infection is usually not a problem. The
only exception that I have had has been with long term refrigeration of
C. reginae seedlings. Infection of C. reginae
seedlings is usually not a serious problem for refrigeration up to three
months, but I generally refrigerate the plantlets for at least four
months because in nature our northern Minnesota plants are in freezing or
near-freezing temperatures for a good five months. I have found
that some, but not all, trays of C. reginae
seedlings become infested with yeast over their outer surfaces.
The yeasts apparently feed on metabolic waste products exuded by
the plants during dormancy. Such yeast-infected plants eventually
acquire an alcoholic smell, and their roots gradually become limp
followed by death of the plant. I have found that weekly rinsing
of the seedlings with fresh water eliminates the problem apparently by
preventing the buildup of exudates on plant tissue surfaces.
Fortunately, the yeast
problem has not appeared with Cyp species other than reginae, not even with
refrigeration up to five months, so the time-consuming practice of weekly rinsing is unnecessary with these other species.
Following refrigeration
sufficient to vernalize the seedlings, they can be rinsed and planted
out in a suitable soil or mix, the composition of which should be
appropriate for each species.
For a downloadable table summarizing the detailed protocols we are
currently (2024) using for germinating mature seed of a variety of Cyp
species click here.
Bleaching Mechanism.
How Does Bleach Work to Promote Germination?
For those inquiring minds that want to know how the bleaching process works, here is my analysis: The Bleaching Process